Site Planning
Once you have determined what condition your site is in and if and what type of revegetation is appropriate, it is time to get down to the detail of the site.
The next steps are:
- What species do I need?
- What revegetation method should I use?
- How many plants do I need? Or how much seed?
- What type of seedlings? What about tree guards, fertiliser, etc.?
- What do I need to do when?
- What’s it all going to cost?
Please remember that sites in good condition that have intact and healthy native groundcover (native grasses, herbs, forbs), native grassland, some wetlands and cultural sites may not be suitable for revegetation at all, or only low-intervention methods. Make sure you understand the condition of your site.
What species?
This website has localised vegetation profiles for revegetation.
Click here to go to the map. Determine what district or subcatchment you are in and click that part of the map to head to the corresponding profile pae. Here you will see the species of plants you should be considering.
Not all plants are readily available for revegetation – seed may not be available or readily germinated in the nursery. In a highly degraded site, planting should reflect natural succession – a higher number of tough pioneer species (like Eucalyptus spp. and Acacia spp.) initially to create the microclimates for understorey and more sensitive species that can be introduced later on.
Planting groundlayer plants into a highly degraded site is often disappointing – plan ahead to introduce those later if you want them (see Medium term: twelve months to three years after planting).
What revegetation method?
The method you choose will depend largely on the condition of the site – where is it on the vegetation condition continuum?
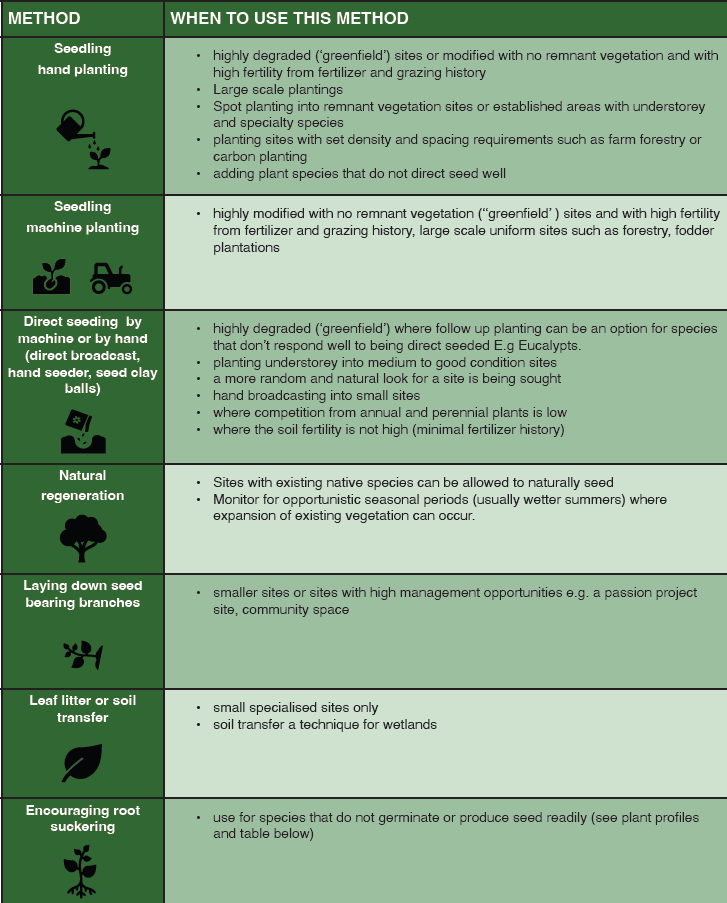
Revegetation methods and when to use them
Regeneration
Plants will readily naturally regenerate when conditions are optimal, this includes seasons with higher-than-average rainfall years, ground that has less competition from weeds and lower grazing pressure.
Minor disturbance (raking, shallow ripping, weed & biomass control, burning) may be used to encourage seed germination.
It is common for trees (eucalypts) to come up from seed in revegetation rip lines in highly modified sites.
In some ecosystems (especially in the drier rangelands) plants do not readily set seed and rely on vegetative growth, or suckering to spread. This table (Figure 20) identifies plants that can be encouraged to regenerate through suckering when roots are carefully manually disturbed. Landholders that have experimented with this technique have observed responses and reliability of suckering in descending order of success.
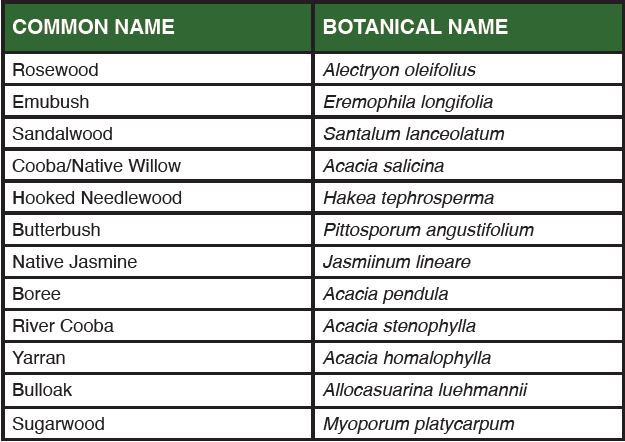
Species that respond to stimultion for root regeneration (suckering)
Other species that are known to sucker include: Deane’s Wattle (Acacia deanii), Drooping Wattle (Acacia difformis), and Silver Wattle (Acacia dealbata).
To stimulate root suckering the following steps are recommended:
- Use a tractor with a single tyne ripper.
- Break or disturb the surface roots (10-30cm from soil surface).
- Disturb roots in a single pass at a distance outside of the drip zone where its roots can still be seen.
- Avoid disturbing roots on all sides in one season (this can compromise stability and health).
- Results can be best when this is done in the spring.
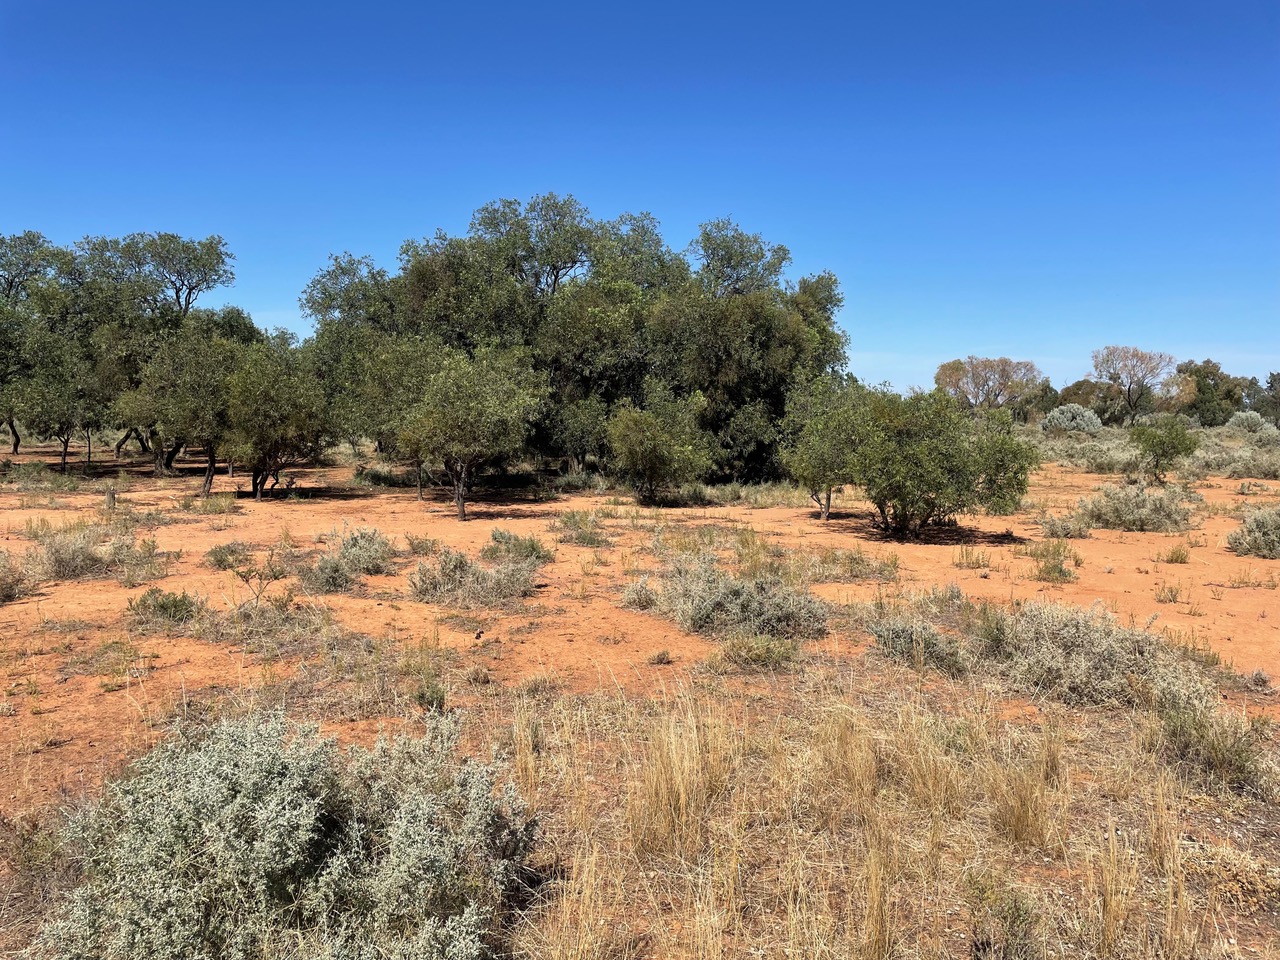
Example of root suckering Photo: Michael Bull.
Reseeding
‘Passive’ Reseeding
This is a low-intervention, targeted method for sites in good condition where you want to reintroduce species or achieve small, targeted revegetation. It involves laying down seed-bearing branches or transferring soil or leaf litter from a better site.
General tips
- Ensure this does not adversely impact the site that is the source of branches.
- Minor disturbance (raking, shallow ripping, weed control, burning) may be used to encourage seed germination.
The outcome is not guaranteed so this method is generally not suitable for sites where a broadscale outcome is required, and is suited to sites where people are very committed to ongoing management.
(see Deeper read Seed Collection)
Direct Seeding
Direct seeding involves applying seed (including pre-treated seed) to the site either by hand, through transfer of seedbearing material or by machine. It is most successful for sites with more resilience and less nutrient enrichment – less degraded sites. Seedlings are less likely to be swamped by introduced weeds, and it is a low intervention where there is native groundcover already.
Direct seeding can take up to five years for full germination, but the result is a more ‘natural’ look rather than straight lines of planting.
Agricultural air seeders may be used for very large scale direct seeding when scale, access, soil and seed availability are appropriate.
There are a number of different direct seeding machines – speak to the contractor as to what might be best suited to your site.
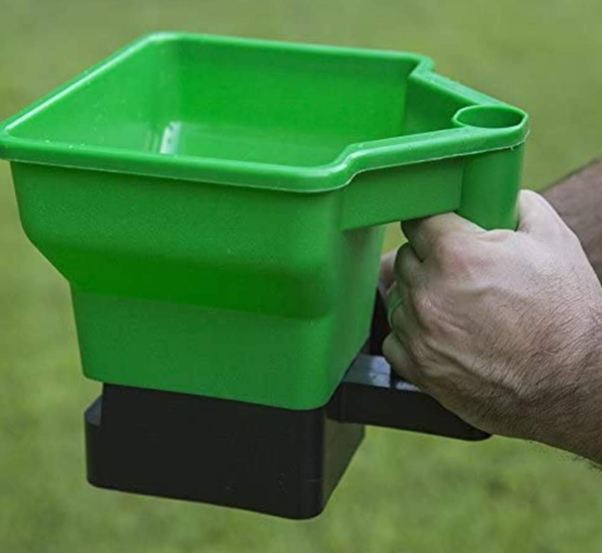
Figure 22: Hand seeding might mean broadcasting seed by hand or using a hand-held spreader such as a fertiliser spreader.
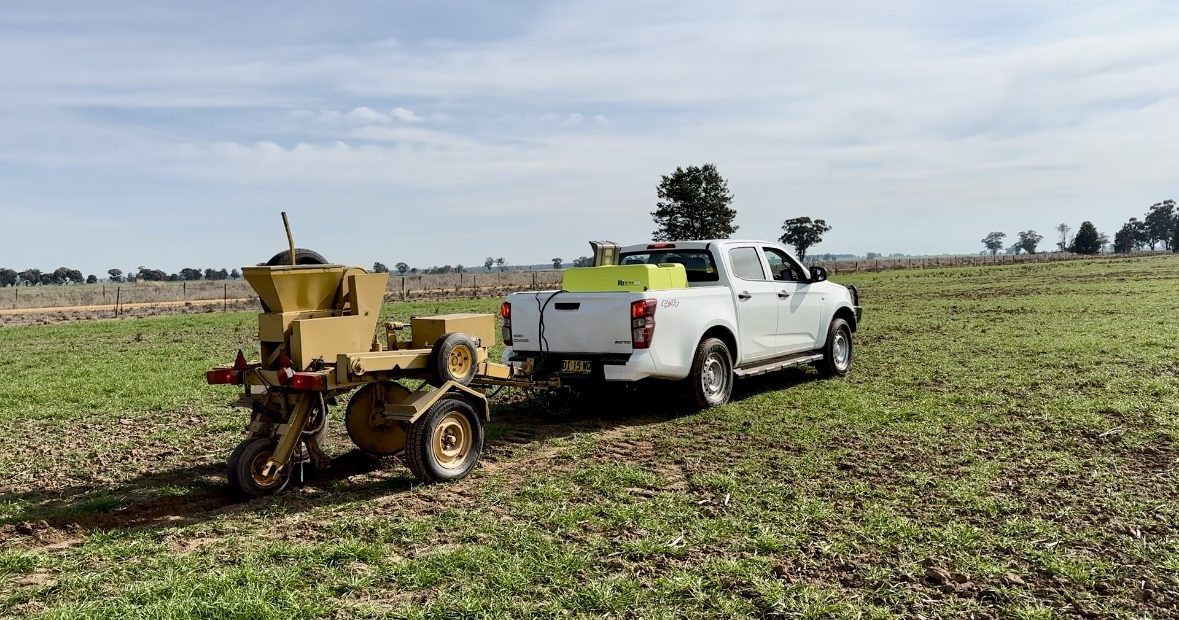
Figure 23: Direct-seeding machine. Photo: Judy Kirk
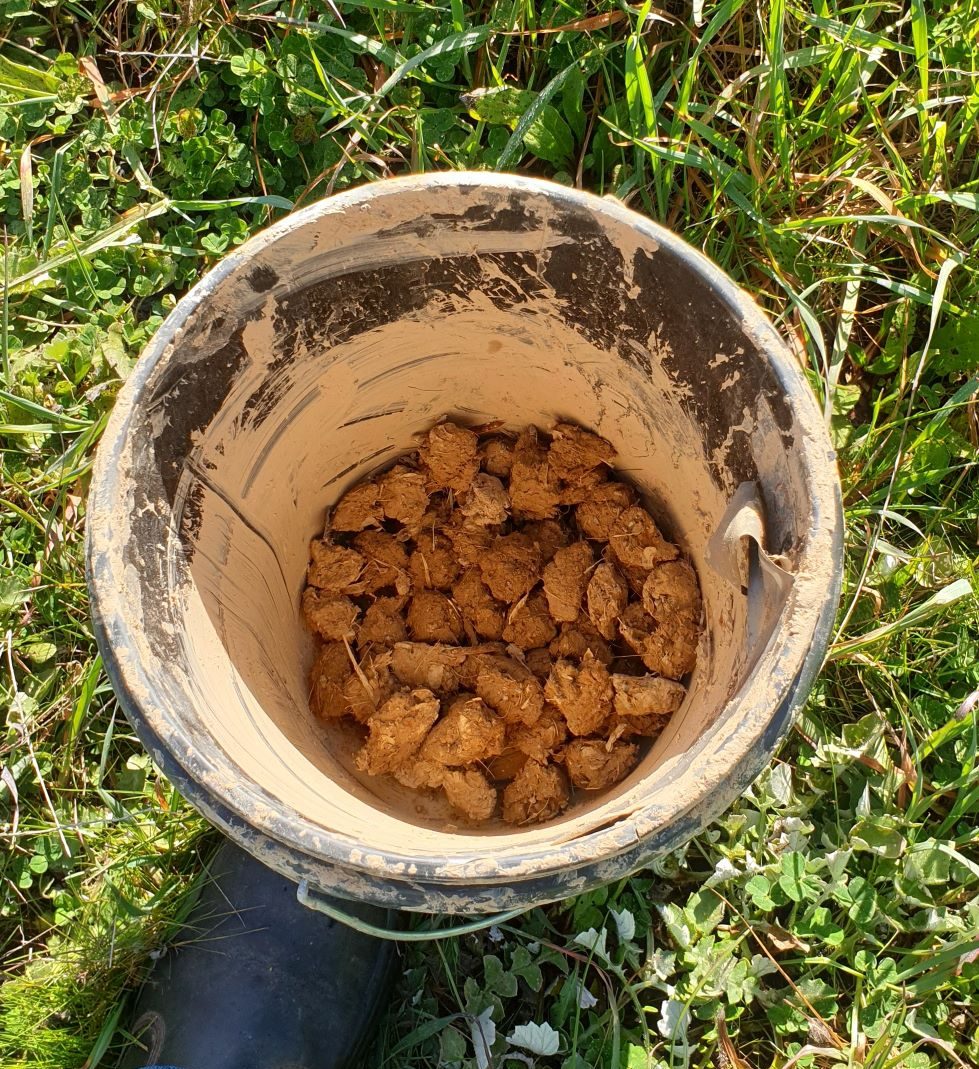
Figure 24: Seed may also be distributed in specially prepared clay balls.. Photo: K. Durant/HLN
In general:
- Pre-treating seed increases germination success.
- Soil disturbance using tools like fire rakes, or ripping may increase germination.
- Be prepared to add seedlings of species that don’t generally germinate well as direct seeding. Eucalyptus spp. fall into this category.
- Be patient – direct seeding can take up to five years for full germination. Regular monitoring for germination, and weed and pest control is recommended
How to calculate amount of seed required
Contact your direct seeding contractor for specific recommendations but in general for woodland restoration you need 600–800g of seed per hectare.
To calculate the amounts you can work on 3km of seeding per hectare and the amount of seed required per km can vary but the range is generally 200–500g/km depending on what vegetation might already be on the site and what you are trying to achieve.
Revegetation with Seedlings
Replanting involves revegetation with seedlings and they can be hand planted or machine planted.
Most highly degraded (no native vegetation, ‘greenfield’) sites benefit from ripping and spraying of the rip lines to improve ease of planting (see Chapter 6 Site preparation and planting) whether planting by hand or machine.
Machine planting is generally done by a contractor and certain machines require particular seedling growing systems to suit them; seedlings must be well advanced and site preparation needs to be very particular. Take advice from your contractor. (See Planting section.)
Planting Densities
The density of your planting will depend on:
- your planting goal
- the vegetation type for your area (forest or woodland?, plant community type, condition)
- where your site is (soil type, aspect, landscape type).
The figure below gives recommended ranges of plants per ha and the tree:shrub ratio.
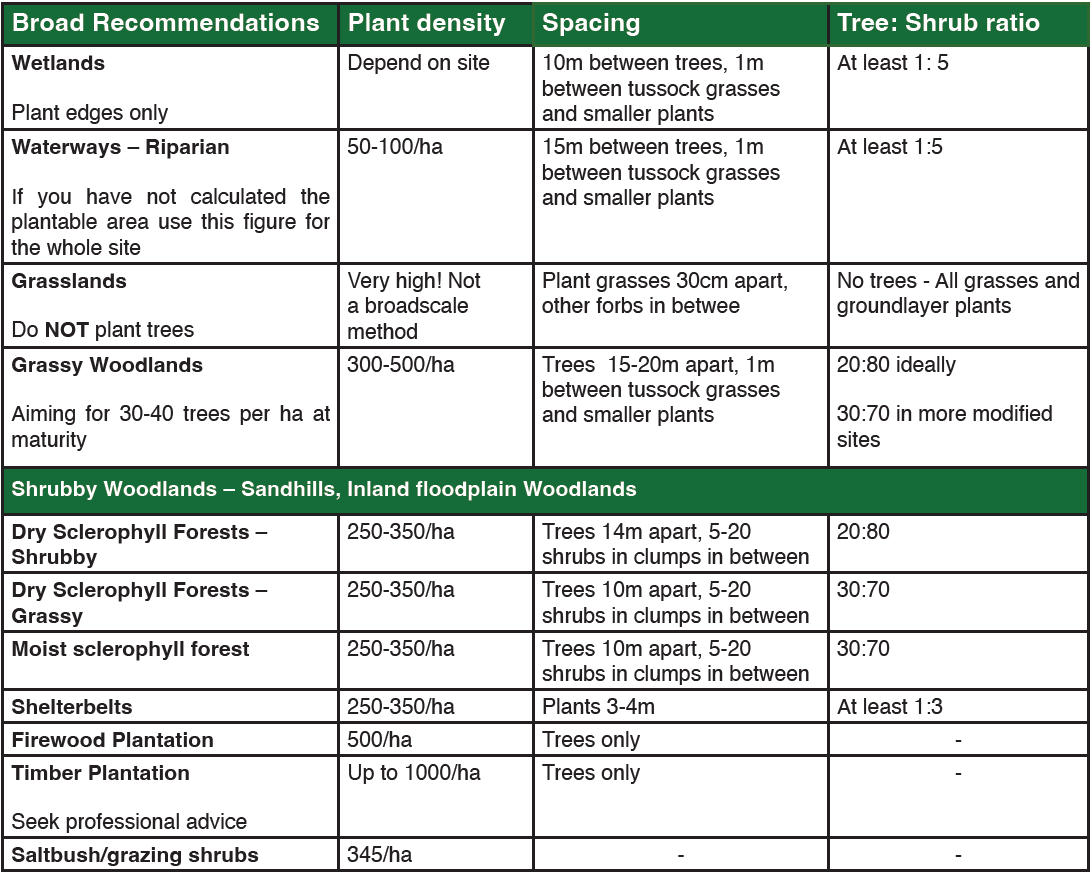
Recommended ranges of plants per ha and tree:shrub ratio guide.
Every site is different – this is a guide only.
Consider the following:
- Reality check your site characteristics – are you in a high or low rainfall zone, shallow or deep soils, a south or north facing site? In sites with lower rainfall and poorer soil, go for the lower end of the range; sites with higher rainfall and better soils can support the upper end of the range.
- Adjust the tree:shrub ratio rather than increase the density beyond the recommendation. If you do go off recommendation, start with the tree density you want and add shrubs and understorey to make up the numbers. Remember the size of the plant once it is mature.
- Look ahead – denser plantings can be useful for outcompeting weeds initially, but you may have to remove some later to get a good outcome for biodiversity and growth.
- Account for regeneration – if there are remnant trees present, site preparation can sometimes stimulate regeneration, so be aware of that when doing your numbers. You can have too many trees!
Groundlayer plants can be additional to the recommended density of trees and shrubs, and plant in between the others. If it is a scalped site, plantings should follow the grassland recommendation.
Planting for carbon sequestration, shelterbelts and forestry have their own specific recommendations (see Chapter 4).
And remember – leave gaps for flyways around wetlands, and basking habitat around rocky outcrops.
Refer to the design principles in Chapter 4 for more detail on what is suitable for your site.
Calculate number of seedlings
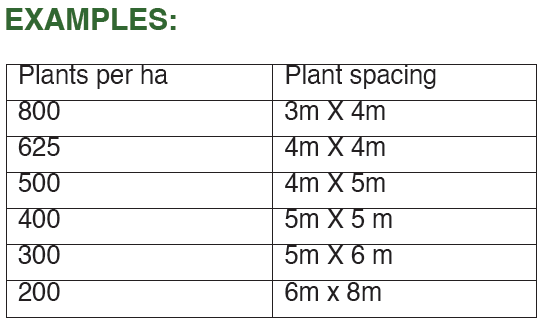
Numbers per hectare (ha) translate into to grid spacing – this can be used to get a ripline spacing, and then a plant spacing on the ripline. Here are some examples to give you an idea:
For some sites the whole fenced area may not be able to be planted, so estimate the plantable area either by:
- direct measure on a map
- a percentage of the total area, or
- metres of rip line.
To get the number:
- estimate the plantable area in the site – exclude all the waterways, areas you want left open, areas you can’t get to or that already have vegetation
- multiply the plantable area by the desired density
- if ripping, you can use the length of rip lines and divide the total by the desired plant spacing
- for remnant enhancement planting you might only require understorey plants and they can be planted in patches rather than filling the whole site – it will be a sitespecific estimate.
Find out more…
“Native Revegetation Standards – Revegetation Planting Standards – Guidelines for establishing native vegetation for net gain accounting” Department of Sustainability and Environmental – Victoria 2006
“Guide to Planting Densities – Recreating Habitats from Scratch” The State Department of Victoria – Department of Natural Resources and Environment 2002.
Selecting and ordering seedlings
Order plants from the nursery at least six or seven months before planting, usually by October /November the year before planting.
Plants can of course be ordered later than this but numbers and the choice of species and provenance might be limited.
For specific and unusual species you need to order at least twelve months ahead, in case the seed isn’t available and needs to be collected.
To help with plant selection
- Determine the number of plants you will require (see How to calculate your numbers – seedlings).
- Once you have ripped, review the numbers and update the nursery if it’s changed significantly.
- Choose the species you would like from your area profile in Part 3 of this guide.
- Consider being climate ready and including some plants from an alternative seed source in your climate analogue area or an alternative nursery that uses local seed from that area (see Climate readiness).
Ask your local nursery
Create a list of plants and the numbers you need and send this to your local nursery to get a quote. Be sure to ask:
- which growing system they will use for the plant species you have ordered (see What type of seedling?)
- cost per plant – are there any specialty species that may cost more because of special growing conditions or growing from cuttings
- costs and timing for delivery
- are there any potential substitutions if there are changes to availability (disease or germination failures)?
Recognising a Quality Seedling
The quality of the seedling when it is planted can have a huge influence on success.
Size doesn’t necessarily matter – generally smaller healthy plants can cope with the stress of planting out: after being tended every day in a nursery they are removed from the pot, planted in the ground and usually left to fend for themselves.
What does matter is:
- root to shoot ratio no greater than 1:2
- no weeds in the pot
- healthy growing tips on foliage
- healthy roots that can hold potting mix together when taken out, and have white growing tips and are not pot-bound, with yellow or woody roots.
Another key to success is to plant as soon as possible after seedlings leave the nursery. It may be a perfect plant when you pick it up from the nursery but three weeks forgotten on the veranda before planting can make a big difference!
Collecting your own seed
Seed collection needs its own manual and if you are interested in this there are specific Florabank guidelines for the collection of seed. Florabank guidelines can be found here. But here are a few considerations.
- Generally, the seed collection season runs from November to February, although some species retain seed for longer and can be collected at any time of the year.
- Seed collection from rare species might require permits as will collection from some public land reserves.
- The Florabank guidelines set out the ethics involved – collect from multiple plants and collect only a proportion of the available seed from any individual plant.
- Seed needs to be stored correctly to maintain its viability.
- Seed may need to be treated before being used for propagation or direct seeding – this might include hot or cold or smoke treatment, or abrasion.
Some key references are the books by Murray Ralph – Seed collection of native plants, 1993, and Growing Australian native plants from seed, 1997.
What type of seedling?
When you order plants from a nursery, check how the nursery is growing the plants.
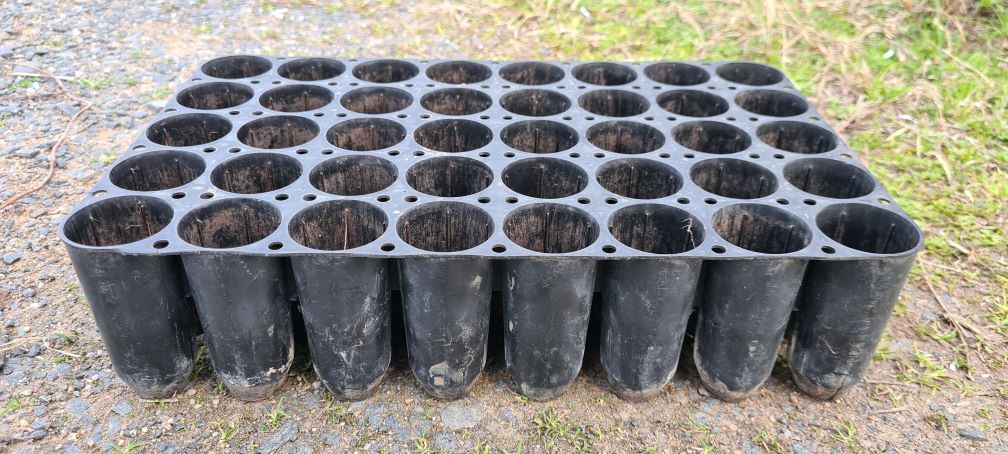
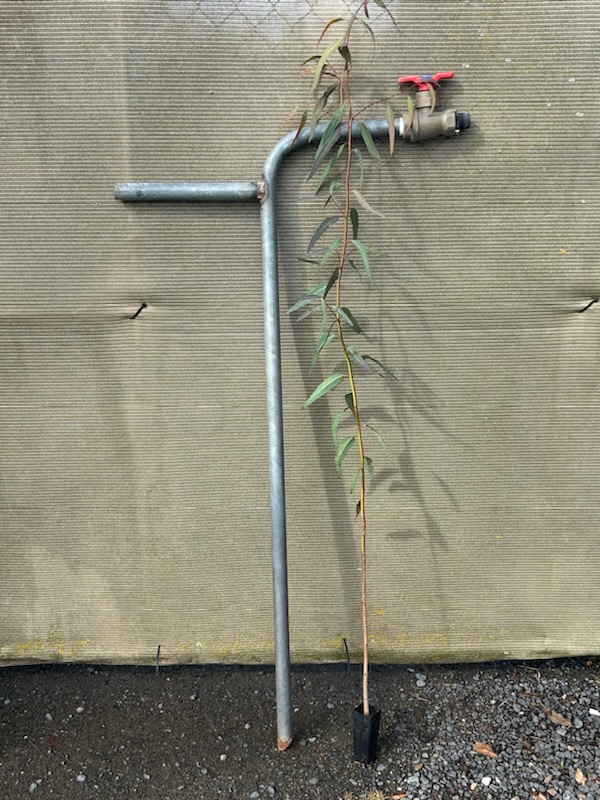
Forestry Tubes
Single plastic tubes with a longer narrow shape with one plant per tube.
Pros – Can be less prone to drying out, ideal if you are giving away small numbers of plants, or your planting method involves individual distribution of plants. Can use with Hamilton tree planter or a larger pottaputtki.
Cons – more expensive, bulkier transport – how many depends on holding tray system used.
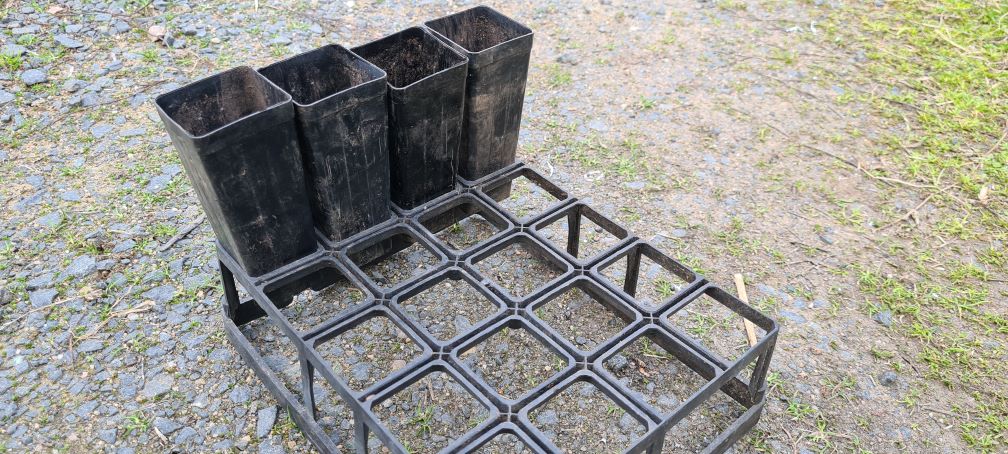
Hiko trays
A cell system most often with 40 plants per hiko, but can be more.
Pros – cheaper per plant and efficient storage and transport (standard single cab ute tray can transport 2000), work really well with the pottaputtki planting system – very efficient
Cons – minimum of 40 plants, although sometimes you can order mixed or half trays from the nursery
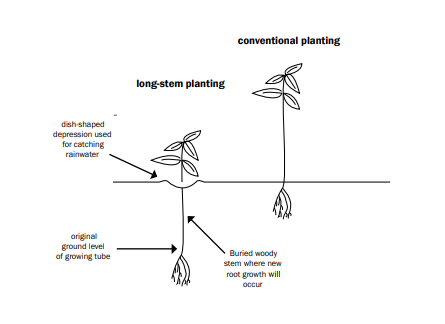
Longstem tube stock
Specific plants grown forestry tubes deliberately to have a longer stem:root ratio. Designed to be planted deeper and for roots to grow from stem nodes.
Pros –possibly quicker establishment, used in riparian bank repair situations
Cons – only specific species suitable (with stem nodes that will root) , ideally planted with a water tube to get them down to depth
Other
There are a variety of different sized cells that are sometimes used for specific plants or purposes– the important thing is being able to recognize a healthy seedling – see ‘Recognising a quality seedling’
PROTECTING YOUR SEEDLINGS
Weed Mat, Mulch and other groundcoverings
Weed mat or mulch is not generally recommended for broadscale plantings, but it may be used in specific situations like landscaping works in parks and gardens, erosion treatments, seed-production areas and in organic production systems.
There are many products available for rehabilitation sites (e.g., embankments) where erosion is a risk – these are very site specific.
Pros – can hasten groundcover and help establish plants on difficult slopes.
Cons – very expensive, waste issues – non-biodegradable products are generally not recyclable.
Tree Guards
Why you would consider tree guards:
- reduce pest animal impact on new plantings – rabbits, deer, kangaroos
- moisture retention, frost protection and shading effects
- easy assessment of survival rates
- visual impact – to remind others the plantings are there.
Here are a few things to take into consideration when deciding whether to use tree guards:
- Cost – can add up quickly when you include the guard itself, two to three stakes and the labour to install the guard.
- Removal – budget time and labour to maintain the guards and take them off two to five years after planting.
- Plastic pollution – biodegradable cardboard guards have become available as an option in more recent years but are expensive.
Investing in control of grazing pest animals such as rabbits, hares and deer has a far greater long-term result and can be more cost-effective, plus it has other benefits for the farm.
Consider other ways to manage grazing impact in designing the site – avoid long sprayed rows in favour of random spot-spraying, or maintain fallen timber and debris to shelter seedlings.
If you do use tree guards, consider investing in biodegradable guards to avoid plastic litter.
Find our more…
North Coast CMA – Bush for Birds: Tree guards (Duration: 10 minutes)
Timing of Planting
Across the guide area, recommended planting times will vary, but April to September is the broad planting window in this part of NSW.
With climate change, there is likely increasing variability in seasonal rainfall patterns, but for the Riverina and South West Slopes the season of rainfall will still be in that window. When faced with less predictable rainfall, the inclination is to change to autumn rather than spring planting, but increasingly unpredictable autumns mean that also comes with risk.
Making a decision based on the weather and short-term seasonal predictions is most useful, but keep in mind you may also be constrained by when the plants become available at the nursery. You can order plants for a certain time, but seasonal conditions sometimes determine when exactly they are ready – nurseries generally prefer to harden off plants to frost before they release them, and the timing can be unpredictable.
Supplementary Watering
Ideally, the need for watering is managed with the time of planting and good site preparation, which ensures that the plant goes in with maximum moisture and gets the benefit of at least some further rainfall. Ripping and weed control before planting can improve moisture retention and reduce weed competition and the need for supplementary watering. However, we know this doesn’t always work out and the need for watering is highly dependent on seasonal conditions. In more arid environments where rainfall is very unpredictable, automated watering systems can be considered to ensure establishment, but this is expensive and requires access to a water source.
Planting in winter with good preparation should negate the need for watering at planting. If you do think you need to water plants – plan it for late spring as the soil is warming, which may be of greatest benefit in a tight season.
Fertiliser
Seedlings usually contain a slow-release fertiliser that may still have residual effect when they are planted; generally fertiliser is not recommended for most revegetation types.
Pros – it may be useful in some circumstances where soil is limited, e.g., a quarry rehabilitation or extreme erosion sites; it’s common practice in commercial forestry.
Cons – fertiliser must not have direct contact with the root ball, which makes planting more complicated, and adds cost.
Fertilising at a winter planting can be a waste as the plants are not actively growing, and if they are forced it can create unwanted growth making them vulnerable to frost damage. Fertilising may be more beneficial after planting in spring.
Browsing deterrents
Grazing animals such as rabbits, hares, goats, deer, kangaroos, wallabies and wombats can kill young seedlings.
In recent years products have been developed that can be sprayed onto seedlings to deter browsing and offer an alternative to guarding seedlings. The theory is grazers try the seedlings initially and experience the unpleasant taste and grittiness which stops them trying again. Seedlings are sprayed with the product before planting, usually in the nursery.
Pros – may be cheaper with less waste than guards.
Cons – there is an additional cost per plant, effectiveness is not guaranteed, it does wash off so best practice is to reapply the product a few times during early growth phases, which is not easily achieved in a biodiversity planting.
Find out more…
NECMA trial report
Arborgreen website for Sen-Tree Browsing Deterrent
Sen-Tree Browsing Deterrent Monitoring
Borrowed plant defenses: Deterring browsers using a forestry by-product
Non-lethal strategies to reduce browse damage in Eucalypt plantations
Grass Control
If there is a lot of grassy trash (biomass) on the site, you may need to reduce it before site preparation. Heavily graze the site if possible or slash/mow the lines before you start your site preparation – knockdown sprays work better on fresh growth and ripping is more effective.
This is necessary especially for direct-seeding sites as the seeder tine can’t go through high biomass easily and seeding is less efficient and effective.
Cultural Heritage Values
If your site has cultural values – objects, features like ovens, middens, scar trees – or it is a special place that is important to First Nations People, talking to First Nations People about your plans for that site is very important. Start with your local Land Council. Looking after these sites is the most important thing you can do, and usually that means fencing it from livestock and restoring it. This may include planting of native vegetation but generally means using low-intervention methods.
These sites should not be ripped or highly disturbed for any reason, and disturbance of cultural objects and sites could result in compliance actions.
Ripping
Check first to see if you need to deep rip or disturb your site. The more compacted the soil and the more modified (farmed) the site the greater the need to deep rip planting areas. Deep ripping breaks compaction layers and allows moisture and roots to move down into the soil profile.
The decision on whether or not to rip depends on the site. Deep ripping may not be appropriate if your site has, or is prone to, erosion or is a riparian area. Ripping could cause more erosion. Seek extra advice before heading out with the tractor. In general:
- rip on the contour
- where there is any risk of water running along a rip line, lifting the tines periodically on a rip line run can help to stop this
- ripping needs to be done when the profile is relatively dry so it shatters the soil rather than leaves a groove – in some soil types ripping when wet results in compaction and air pockets that can stop seedling growth.
In drier areas with less reliable rainfall, some tractor implements can create furrows along the rip line to retain further moisture.
Pros – creates a bed for planting with a moisture profile, enables planting using tools, breaks compaction layers and allows roots to penetrate deeper, creates disturbance that stimulates weed growth for spraying.
Cons –generally detrimental to soil health; if you don’t plan to use chemical spray, it will create disturbance that may encourage weed growth; ripping when too wet can cause problems with plant growth; it is detrimental in sites with already good native groundlayer and cultural heritage values.
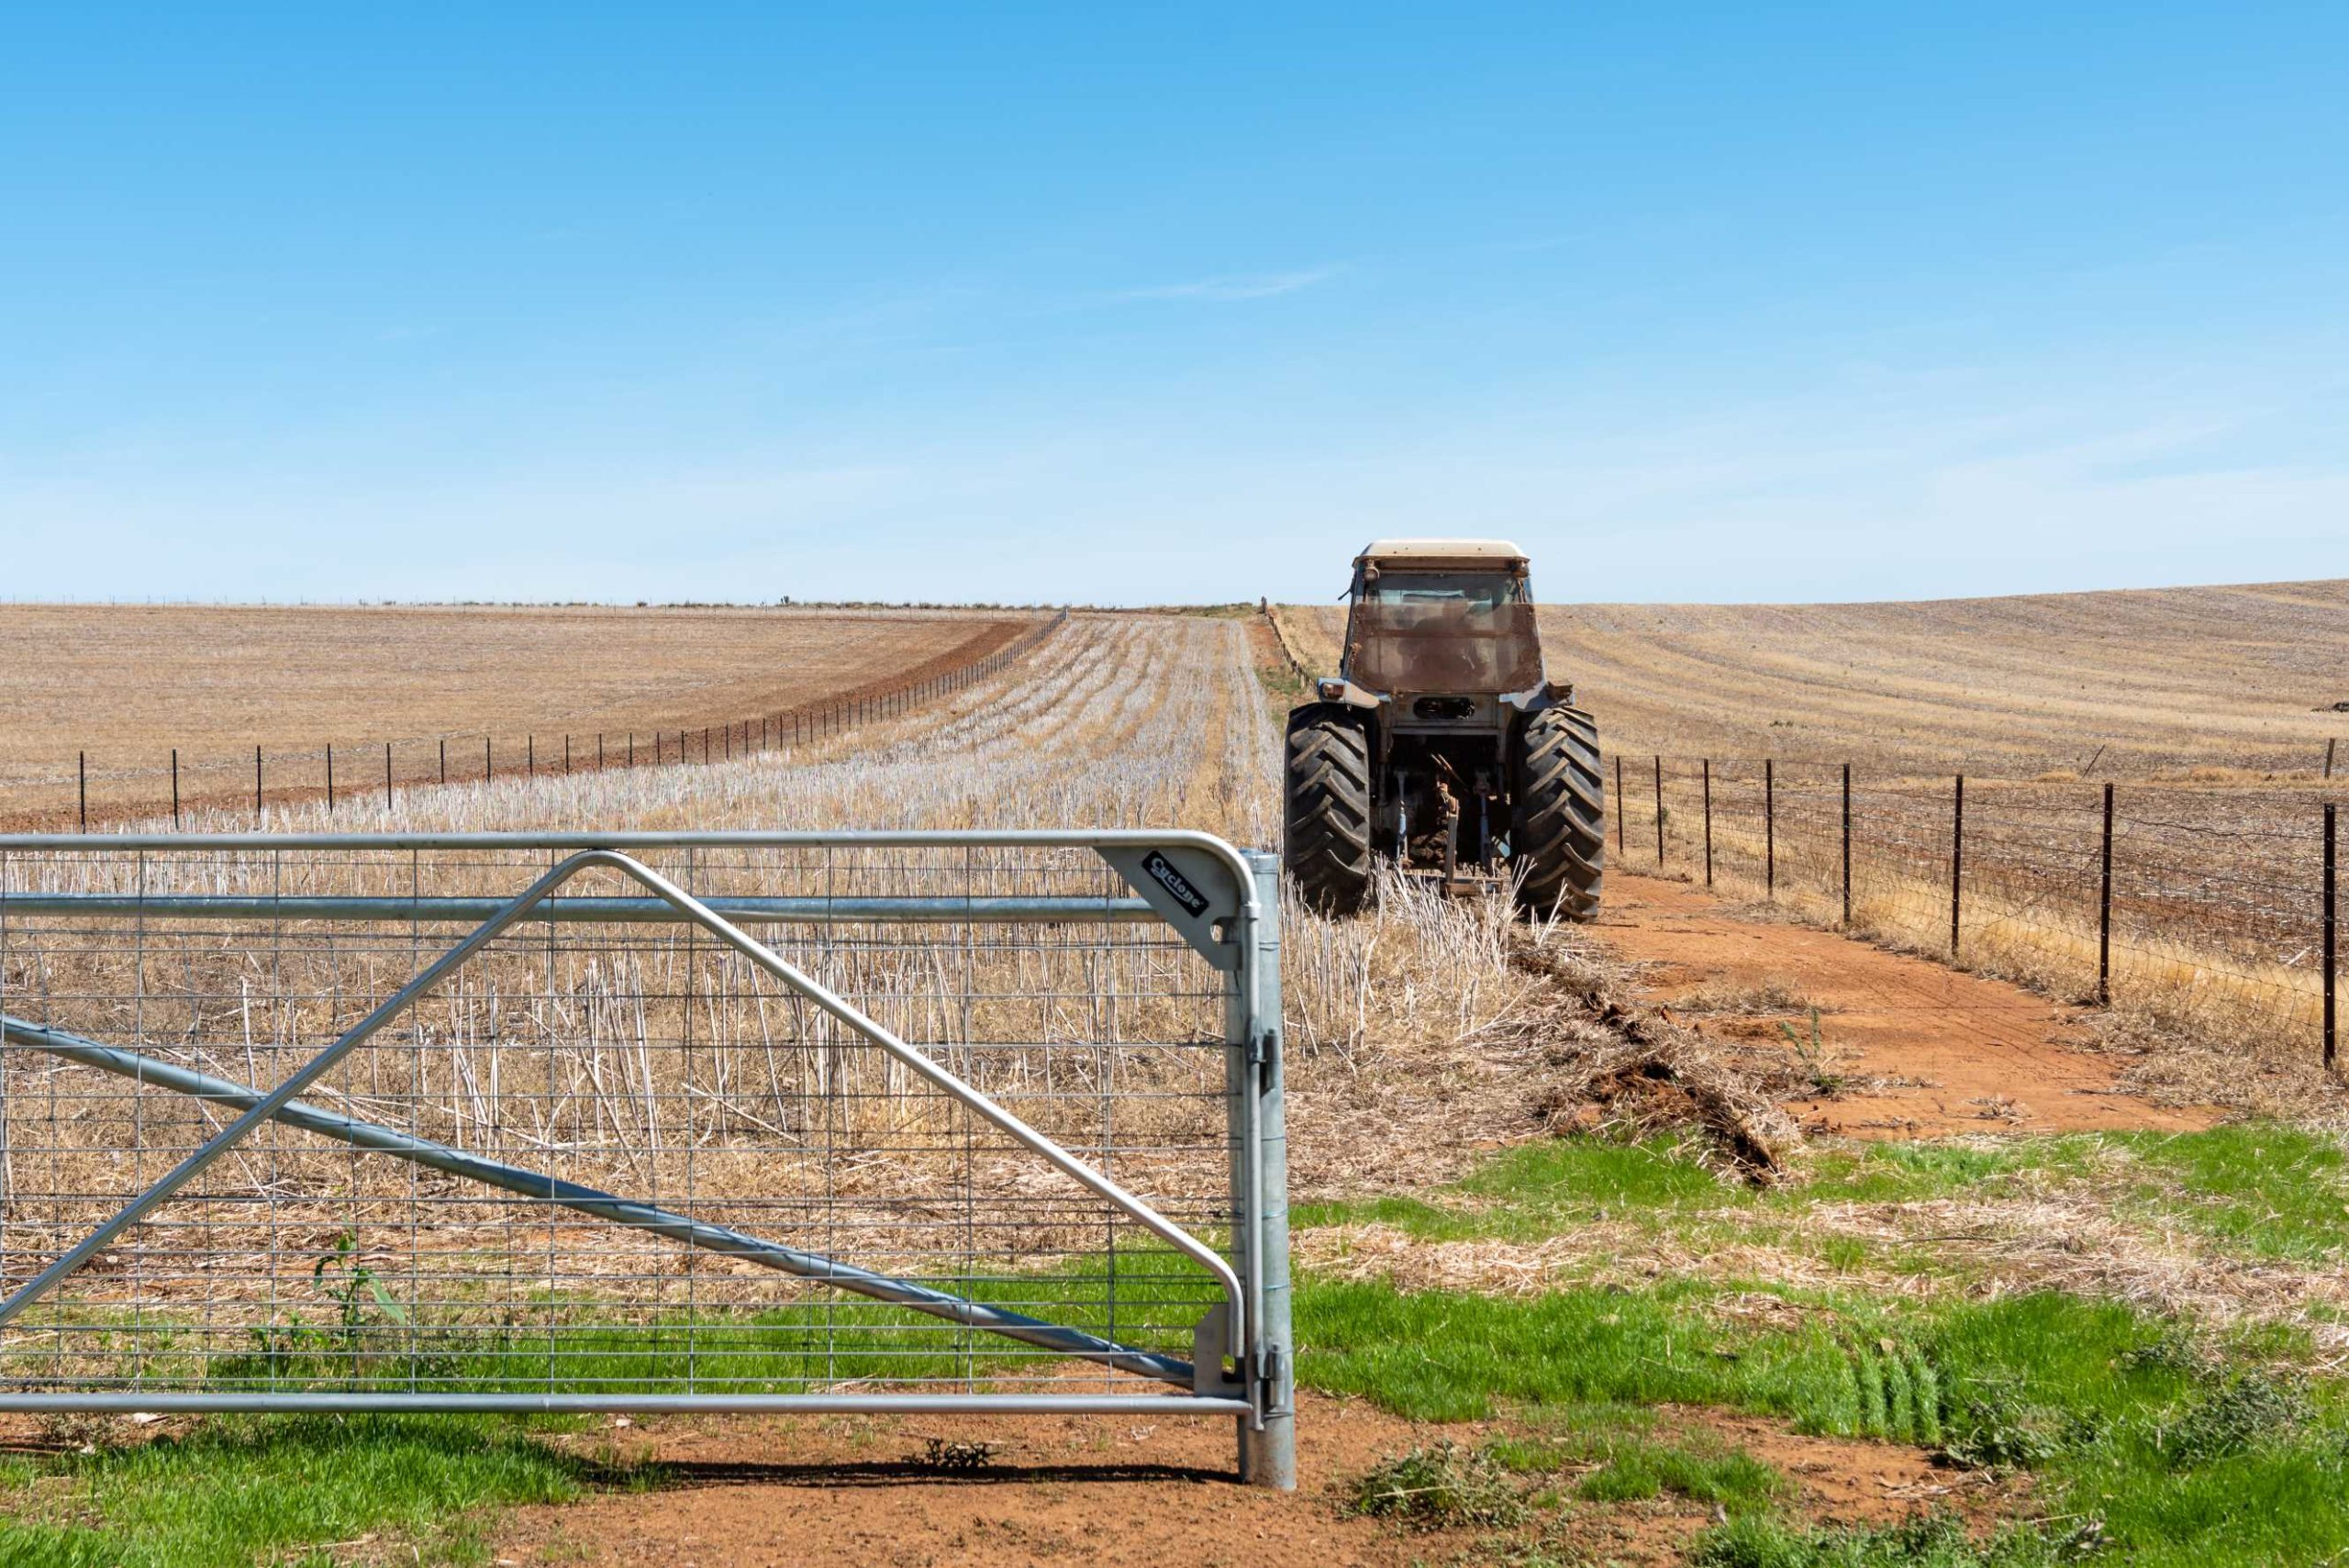
Ripping on a site where stubble has been retained to maintain some groundcover. Photo: J. Whitty
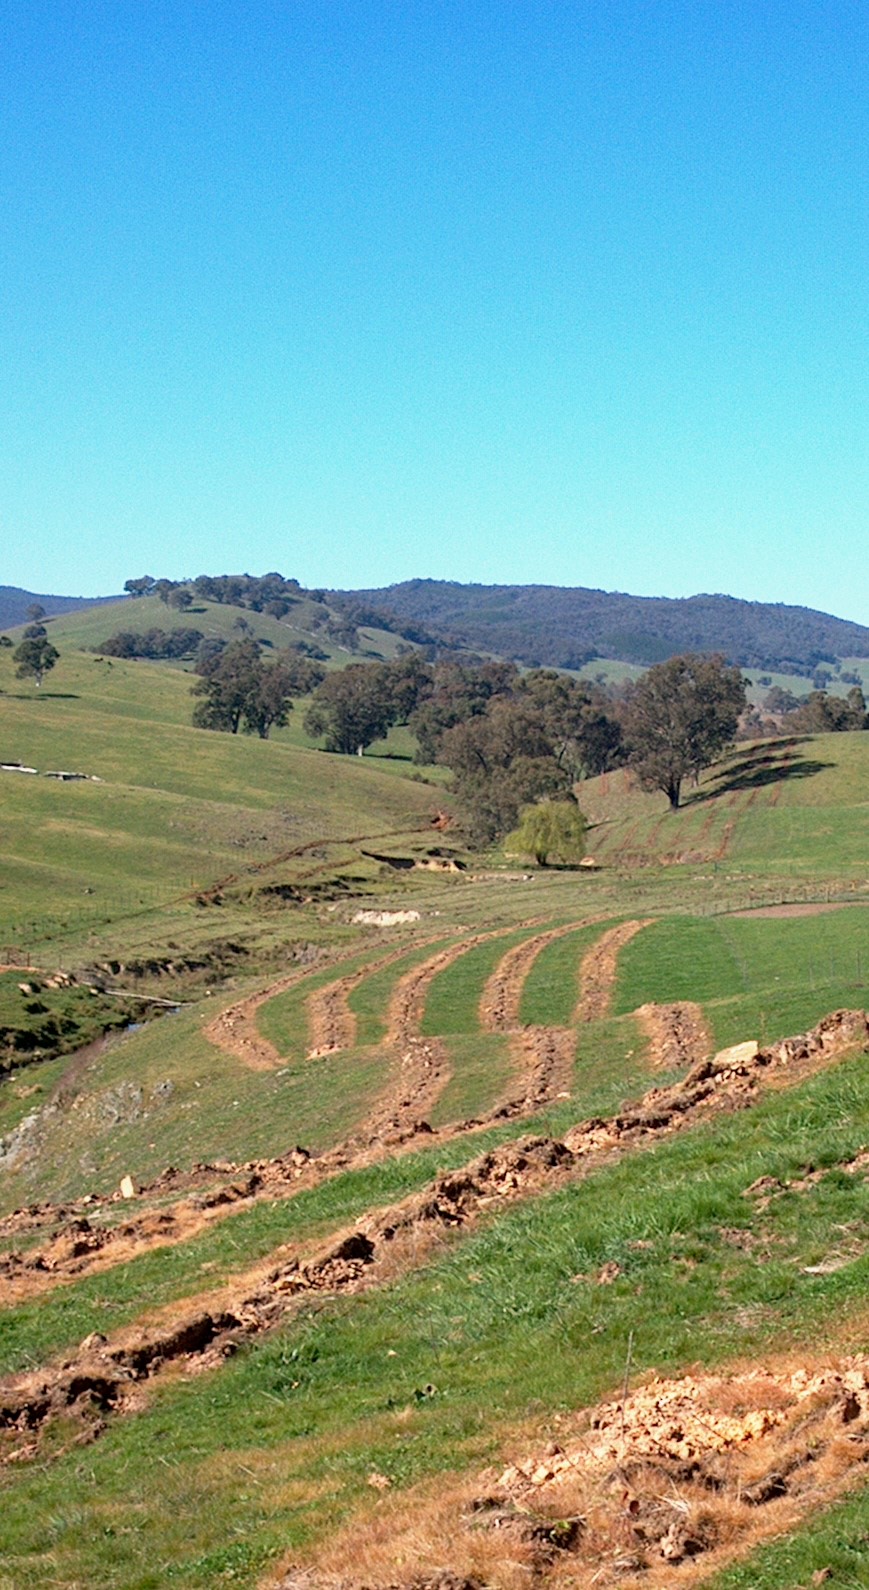
Rip lines that have been sprayed with a knockdown chemical. Photo: K. Durant/HLN
Any site with existing native grass and forb ground layer or potential cultural heritage values should NOT be ripped.
Mounding
Mounding is a practice that is suitable for revegetation of waterlogged sites and specific site remediation. It is not recommended for revegetation for biodiversity – the level of soil disturbance is not appropriate and these wet areas might in fact have wetland values and shouldn’t be planted at all.
Mounding may be recommended for specific sites such as planting for salinity management, remediation of mining/quarry sites and forestry plantings. It is achieved with specialist machinery that has a set of discs as well as a ripping tine. Seek specialist advice from Landcare and/or your local regional natural resource management agency, or the Soil Conservation Service.
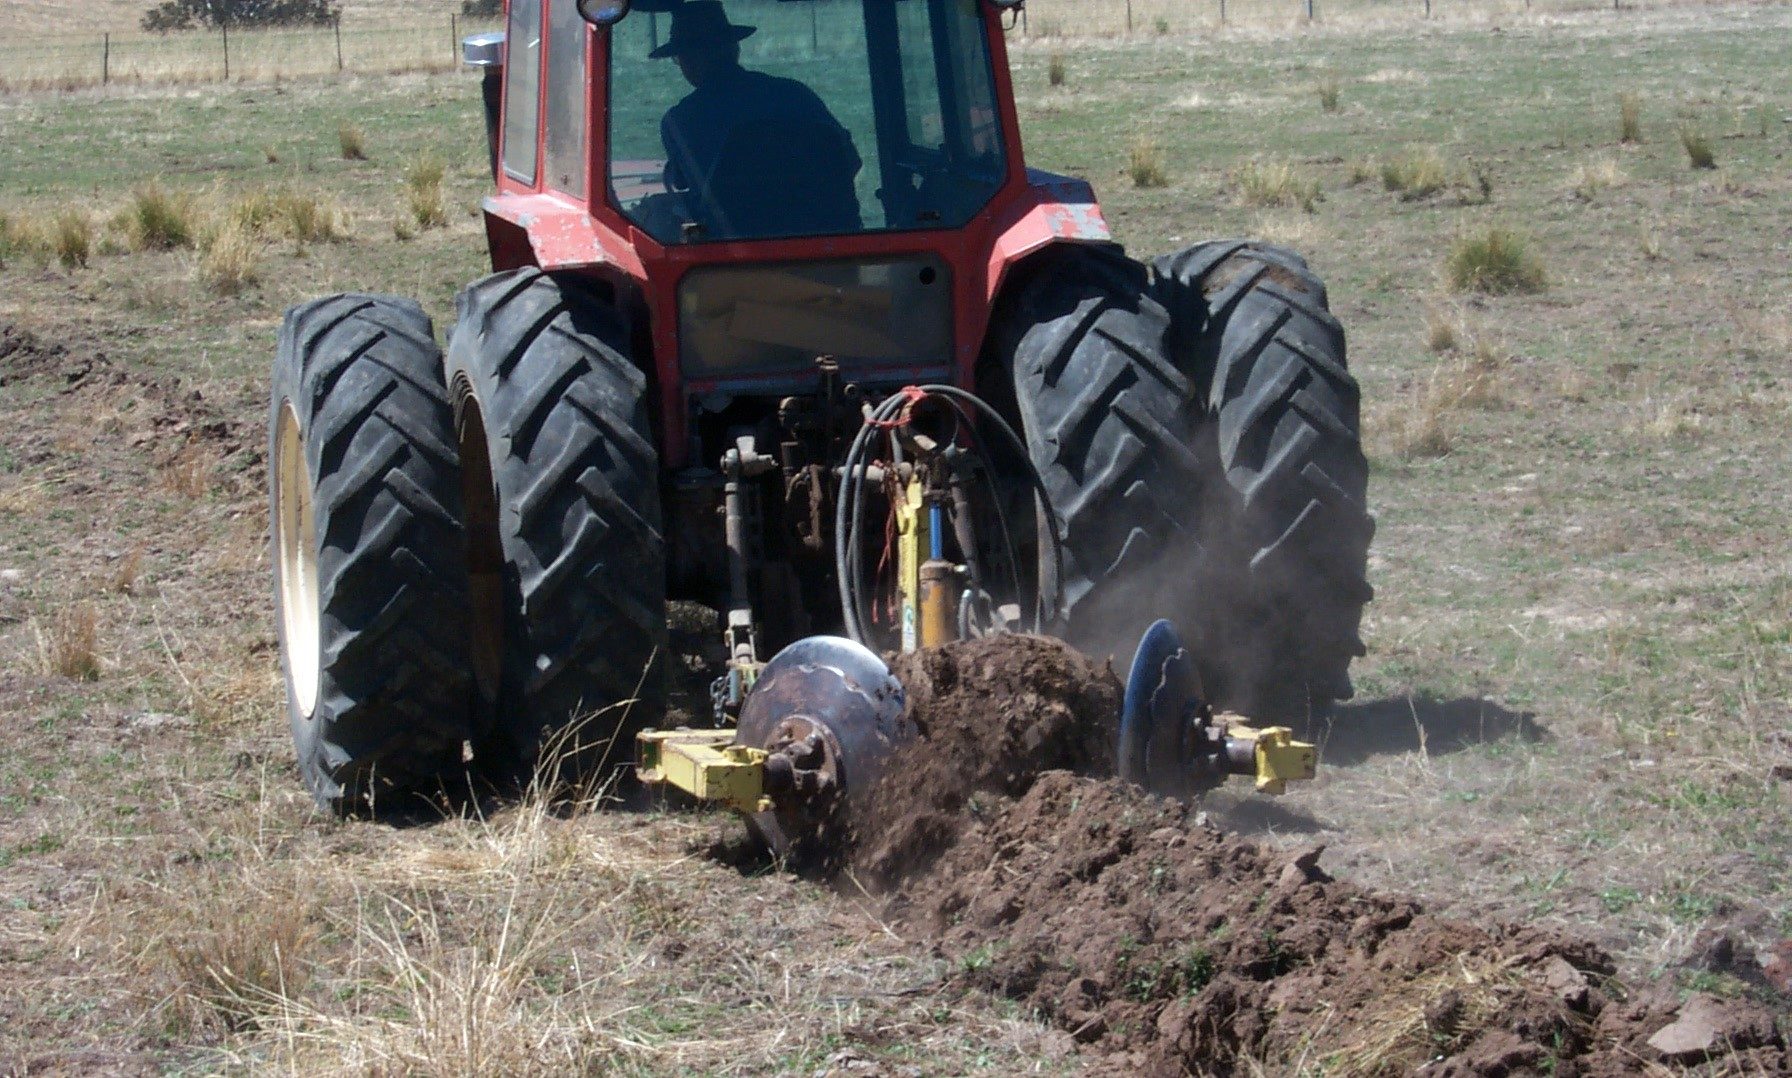
A ripper-mounder being used to create a mounded planting site in a salinity planting. Photo: HLN
Scalping
Scalping involves the removal of the layers of soil that contain high nutrient loads and weed seeds in order to establish native species. It is generally only used in small sites as it has a high risk of erosion, high impact on soil health and is expensive.
The circumstances in which you might consider it are:
- in highly modified or ‘greenfield’ sites with no native vegetation
- landscapes with low slope and low erosion risk
- spot scalping as a non-chemical pre-planting weed control for greenfield sites being hand planted (less risk)
- along rip lines in low-risk sites if you don’t want to use chemicals.
This is a specialist area and a developing technique – do your research and seek advice from Landcare or your local natural resource management agency before considering it.
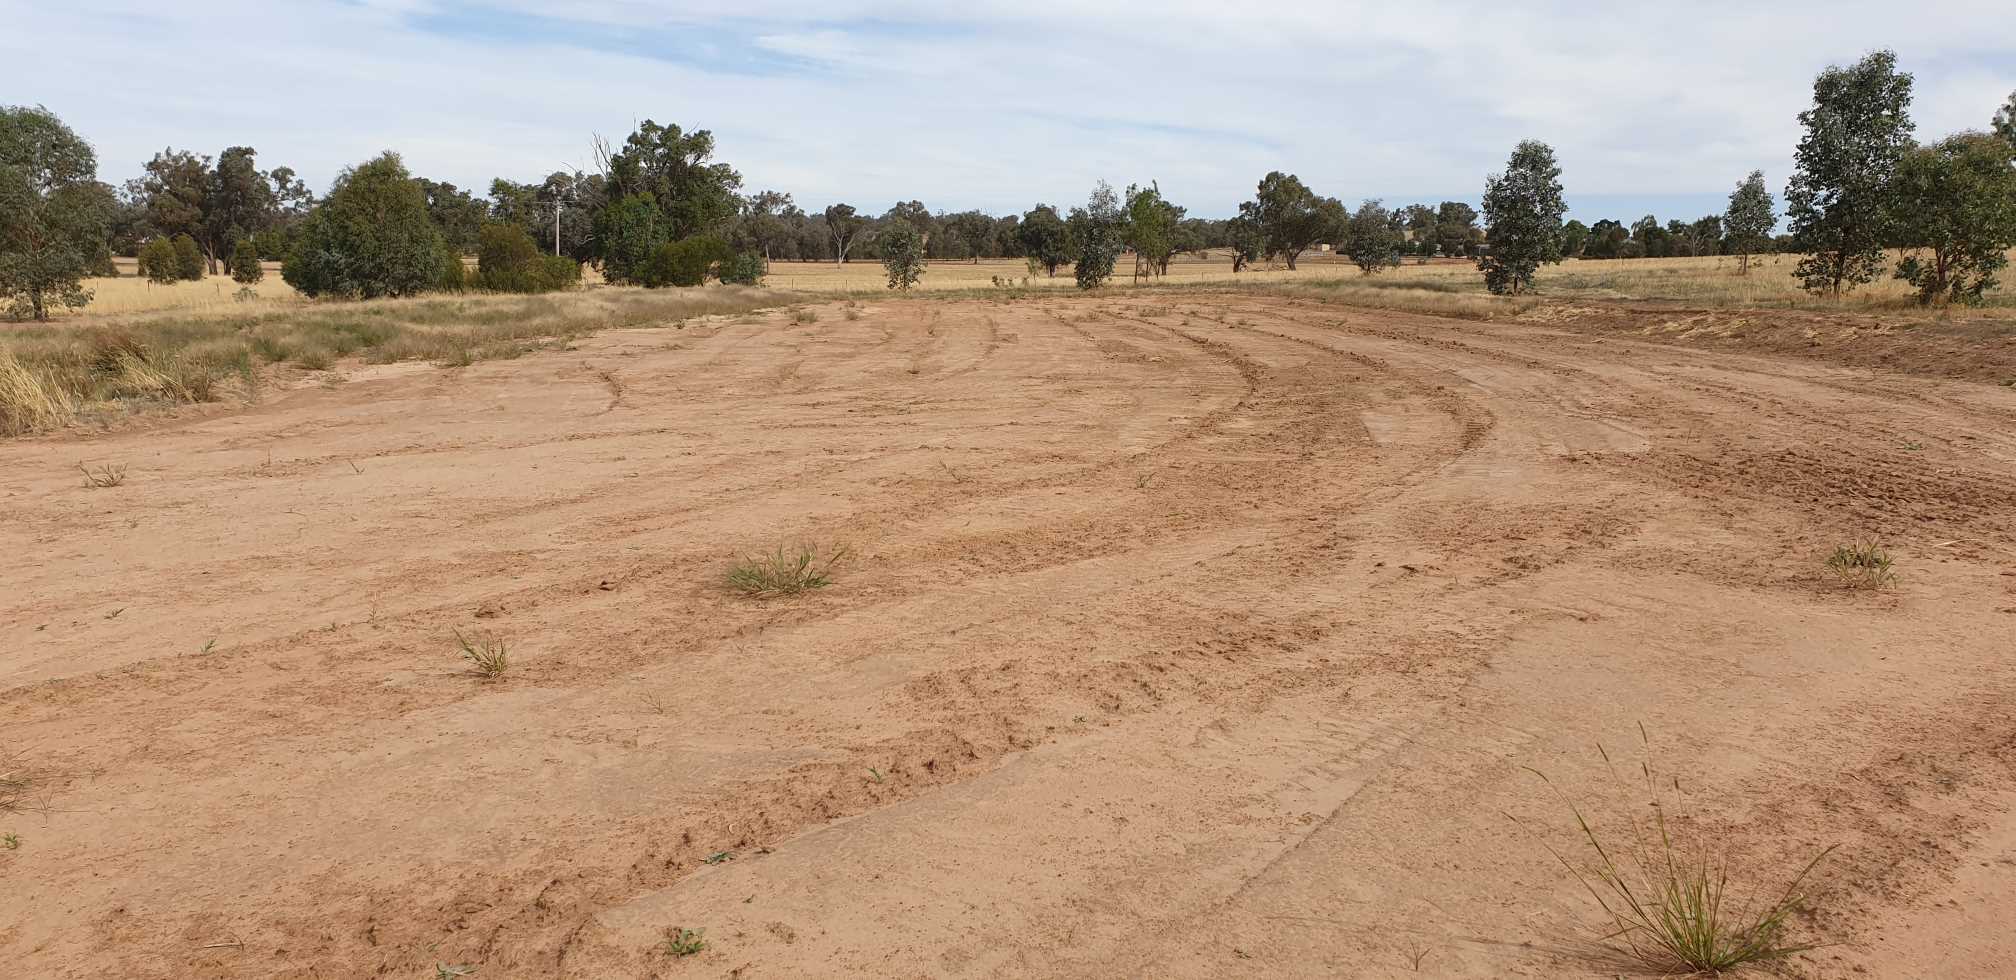
Scalping of a site for groundlayer restoration with the top 10–15cm of soil removed from a highly degraded site. Photo: S. Rose
Find out more…
https://www.malleeconservation.com.au/blog/grassland-scalping
Sharon L. Brown A D , Nick Reid A , Jackie Reid C , Rhiannon Smith A , R. D. B. (Wal) Whalley A and David Carr B (2017) Topsoil removal and carbon addition for weed control and native grass recruitment in a temperate-derived grassland in northern New South Wales, The Rangeland Journal 39(4) 355-361
Cultivation of planting line – Rotary Hoe
Rotary hoeing makes the task of planting into the rip lines much easier, particularly with a pottiputki (see Planting tools), and may be considered if the soil type means there are large clods and air gaps in the rip line. Cultivate just ahead of planting, even on the same day. It is not a necessary component on most sites, but for some it may improve success.
Pros – creates a tilth that improves the soil-to-root contact, and can knockdown weeds just before planting.
Cons – expense and logistics with machinery.
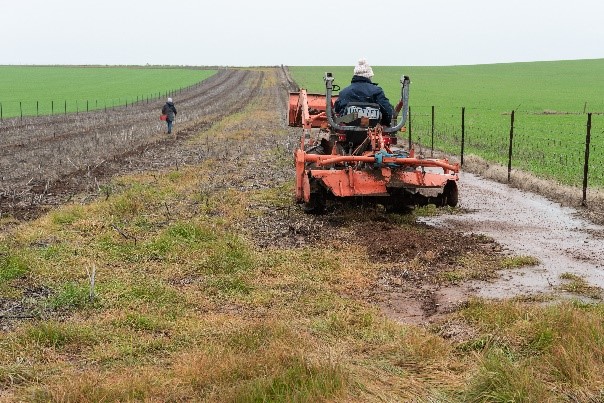
Rotary hoe being run over the initial rip line to break up clods in the rip line and create a better planting bed Photo: J. Whitty
Pre-planting weed control
Pre-planting weed control is recommended to reduce competition for moisture and light from grass and broadleaf weeds in that first three months of planting. Methods include:
- knockdown (non-residual or contact) chemical
- pre-emergent chemical (residuals)
- non-chemical e.g., scalping.
Pre-emergent chemicals are not generally recommended for revegetation due to their wider impact in the landscape, but it is common practice for people who are experienced in their use. Be aware of the plant-back time for any residual chemicals – you need to allow for at least six weeks from application and before planting for most chemicals. Always check the labels.
Remember that chemicals need green, actively growing plants to be effective. If there is a lot of dry grass and biomass on the site, grazing, mowing or slashing may be needed to reduce it first and give some time for the weeds to germinate and put on some leaf area before chemical spraying. If the season is dry, there may be no weed growth until later. Adapt your management to the seasonal conditions.
Site history is an indicator of the level of control that will be required.
Highly degraded, greenfield site or modified sites
- Use a knockdown spray in the spring, and again in the autumn prior to planting. In some seasons a third spray may be needed in the weeks prior to planting.
- Spray planting lines or rip lines only, not the whole site.
- Sites that have lucerne or perennial pastures or significant established perennial weeds (e.g., St John’s Wort, Paspalum, Phalaris, Blue Heliotrope) may need a longer term program before and after planting.
Less disturbed sites (with some native species)
- Spot spray or scalp individual planting locations (20cm x 20cm) only with a knockdown a few weeks before planting.
For all sites
- Woody weeds like Horehound and Blackberry, tree weeds like Privet, African Boxthorn and Hawthorn need to be controlled before revegetation begins.
- nnual broadleaf weeds like Patterson’s Curse, Capeweed, thistles, Wireweed and Fleabane thrive on disturbance and bare ground – in most seasons they will be present after planting but plants will still survive and the germinations will reduce in subsequent years. After planting, weeds can’t easily be chemically controlled without impacting the seedlings. Leave to fate and replant if necessary.
- Seek assistance on specific chemicals and rates from an agronomist or your local council weeds officer.
Remember sites in good condition with native grasses and forbs should not be sprayed at all.
A note on soil health
Understanding soils and the life they hold and sustain is a rapidly expanding area of science. Soils are full of organisms that support decomposition, growth, nutrient exchange, gas exchange, water-holding capabilities and more. To support soil health, take the approach of minimal disturbance. Don’t rip if you don’t need to, and maintain diverse plant cover at all times. Avoid blanket applications of fertilisers, pesticides and herbicides. If you are ripping and spraying, only spray the rip lines so the soil biology can recover more quickly.
Pre-planting pest control
Controlling grazing pests is more efficient than guarding trees. Controlling pest grazing animals (rabbits, hares, deer) at the revegetation site and in local surrounds will have a positive influence on seedling establishment. Contact your local land services for advice about pest-control programs.
A note on native grazing animals
Native grazing animals (kangaroos, wallabies, wombats and some birds such as ducks) can also damage revegetation sites. This can potentially inadvertently reduce the quality and diversity of a revegetation or remnant site. Before starting a revegetation or conservation program, assess the possible threats from native animal grazing pressure to the site and determine the level of protection or management actions you need to make.
The options are:
- tree guards and browsing deterrents, see Tree guards and Browsing deterrents above
- adapting planting method (spot-spraying instead of rip lines) see Tree guards above
- choosing to plant unpalatable species (i.e. prickly)
- exclusion fencing, although this may not be consistent with biodiversity goals.
Find out more…
Guidelines for managing kangaroos by the NSW Biodiversity Conservation Trust (Link to come)
Living with Wombats (link to come)
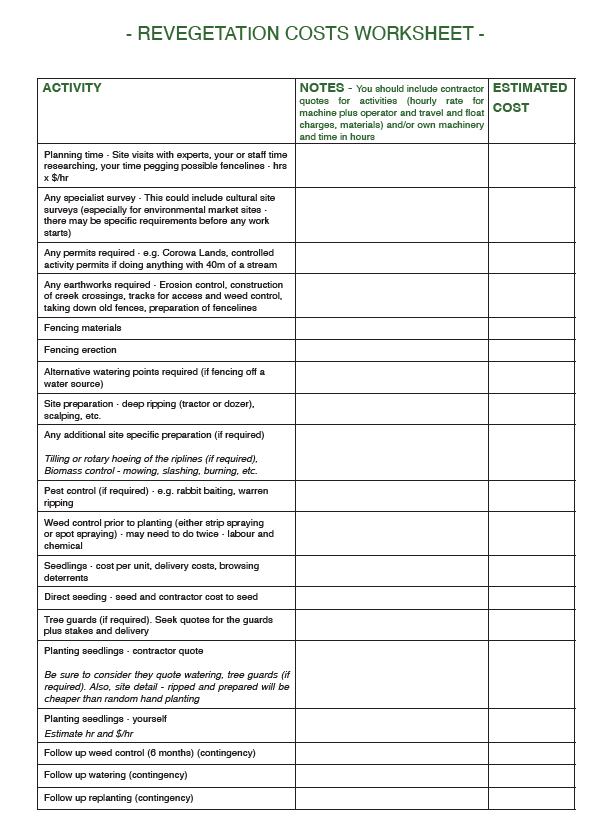
Cost of revegetation
Once you have identified the site requirements (preparation, method, density, type of stock, etc.) you can cost your site.
The following worksheet is a guide to the cost items that may be required for a revegetation site. Costs vary widely – get quotes from rural suppliers and contractors and don’t forget to cost your own time and machinery.
